Showing posts with label diy. Show all posts

Monday, May 13, 2013

Beauty Spotlight | Indian Beauty Secrets


6 Indian Beauty Hypes to Know

There's no denying it, Indian women are some of the most beautiful women in the world. Great genes may play a role, but they also owe a lot to the natural beauty traditions that have made India a leader in homeopathy. Using basic kitchen staples, Indian women have created some of the strongest natural beauty regimens to keep their skin gorgeous and glowing and their hair thick and beautiful. Here, we take a trip to one of the world's most beautiful countries and discover what beauty secrets have kept Indian women gorgeous for generations. (excerpt)
see full article here at Savoir Flair


Friday, December 14, 2012

Organization| Holiday Gift List

Sometimes we have trouble keeping all of the gift ideas for our loved ones fresh in our memory. I created this handy dandy printable list that you can use around the holidays or even throughout the year when you get an idea for someone. And it can help you stick to a budget by seeing exactly where your money is going! Feel free to use this however you desire.


Tuesday, November 27, 2012

DIY| Pomegranate Lip Gloss & Peppermint Foot Scrub

So i recently saw this really interesting and simple way of making your own Pomegranate lip gloss & Peppermint foot scrub from SELF. These could be great yummy gifts for the holidays and they're so easy!  

Pomegranate Lip Gloss         
       

Ingredients  
• 1/2 cup petroleum jelly
• 1 scoop or 2 packets Natural Cherry Pomegranate Crystal Light
• 3 or 4 small jars or tins with lids

• 1tsp Water

Directions
Mix petroleum jelly and Crystal Light in a bowl, adding the water a few drops at a time, until gloss turns berry red. Use a spatula to smooth the formula into jars.

Peppermint Foot Scrub
Ingredients
• 4 strawberries
• 1/2 cup sugar
• 2 tbsp olive oil
• 2 tbsp vegetable oil
• 8 drops peppermint essential oil
• 1 decorative jar


Directions
Make this the night before gifting it—it's perishable after 2 weeks because of the fresh fruit. In a bowl, puree or mash berries, then add sugar and olive and vegetable oils. Mix until well blended. Add peppermint oil 2 drops at a time until scrub smells minty. Spoon into jar, then stash in the fridge. 
Write the expiration date on a card.

Enjoy!

Wednesday, October 31, 2012

DIY| Pumpkin Bowl

HAPPY HALLOWEEN!
 
Pumpkins can have so many different uses if you think outside of the box. Ever tried making a pumpkin bowl! So simple! They can be used to serve dips, chips, punch, bottles, soup and even set out to hold candy for party guests or trick-or-treaters. Check out these cool pumpkin bowl uses:
 
.


Friday, October 26, 2012

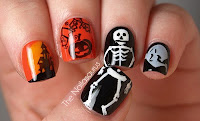
Halloween Nails


Halloween is totally one of my favorite times of year! I love how the season begins to change, and fashion changes along with it. One of the funnest things about it is dressing up for Halloween. Doing my nails definitely a part of that. Check out my DIY Halloween nails above. 
Click on the the images below to see them bigger for more cool Halloween nail inspiration. 


Monday, October 8, 2012

DIY| Color Coded Keys

This 5 min DIY is such a simple and fun way of keeping your keys organized! Use any nail polish and color variations that you have. You can even add designs, rhinestones or glitter to create an original look! Remove and switch out the colors for different seasons. A great thing about this is it doesn't have to be feminine. You can color coordinate your guys' keys using blacks, blues, reds, etc. Here are some cool ways to do it...
Check out the sprinkled cupcake inspired one i did at the bottom!
Would you do this?


Friday, September 28, 2012

Tips| Makeup Brush Guide


How awesome is this brush guide posted by The Beauty Department ??


photo + post by amy nadine, graphic design by eunice chun

These seven brushes are our favorites to perfect your skin. You don’t need all of them, as you probably don’t use cream, liquid and mineral foundation all together! We just get so many emails asking which brush does what, so we’re breaking it up into three posts: face, cheeks + eyes, and today is our face edition with our favorite foundation, concealer and powder brushes. They are an investment but last for at least a decade (I’ve had some of mine even longer!).
With all types of foundations, remember to start at the center of your face (where you typically need the most coverage) and work the product outwards to the perimeter. Also, the best companion tool for brushes is your fingers so don’t forget to blend with them as you use your brushes. And please don’t forget your neck!

Foundation {Cream}:
If you use a cream foundation, you’ll want a flat-headed slightly-slanted brush so it really presses the foundation into your skin as you swirl it all over, giving you a flawless airbrushed effect. Natural bristles are critical for building coverage without streaking. Try Dior’s Fluid Brush or Shiseido’s Foundation Brush.


Foundation {Liquid}:
You’ll want a synthetic, densely-packed flat but wide brush to effortlessly cover more space when you’re in a hurry in the mornings. Look for ones with nylon or Taklon bristles for the smoothest application. I’m obsessed with this angled one from Le Metier de Beaute because you can really get in and around corners of your nose, up under your eyes, etc.


Foundation {Smoothing + Blending}:
I know we’re all in a hurry in the mornings but I can’t tell you how critical it is to take 20 seconds with a clean natural bristle brush and smooth over your foundation before powdering to really blend it into your skin. It will take you from “it’s obvious she’s wearing foundation” to “wow she has such perfect skin.” Try this luxurious one from Cozzette or this budget-friendly one.


Foundation {Mineral Powder}:
This can be a synthetic or natural bristle powder brush, but look for one with a plump shape designed for the swirling motion we do when applying minerals. I’m obsessed with this Tarte brush that is also amazing with liquid foundation.


Concealer {Undereye}:
I love a flat synthetic concealer brush for covering dark circles because you can really “lay down” the product by using the side of the brush. The other component to look for is a tapered edge because this helps you avoid clumping during application. The synthetic bristles will pick up less product so your coverage will last longer (the thicker you apply it, the more likely it will crease and cake).


Concealer {Blemishes}:
Look for a pointed and tapered concealer brush made of synthetic bristles so you can apply it precisely on top of any kind of blemish (pimple, scar, broken capillary, etc.) without touching the surrounding skin. Practice mini-swirling motions gently on top of the blemish then lightly blend the perimeters with your ring finger. For a quick refresher on covering a glaring pimple, click here and remember to always dab a little Egyptian Magic on it first so the concealer has something to adhere to, especially if the blemish is flaky or scabby.


Powder {T-Zone}:
Use an eyeshadow blending brush made with natural hair bristles as a powder brush just for the areas that tend to shine: between your brows, around and on the tip of your nose, your upper lip and your chin. This allows the rest of your face to glow and breathe.